The FTP Uploader widgets allows you to use drag and drop to upload a file to an FTP server. You can setup several FTP servers, and you don't need to buy anything to get it to work. The software is made available under the terms of the LGPL.
Release 1.1: just optimizes some of the code, updates to Neuromancer 0.6.0, adds the version number to the widget, and fixes the password as text error.
Release 1.2: added the ability to specify a default server by setting the variables in PresetServerSetting.js
Help
FTP Widget Server Setup
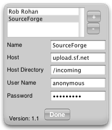
To setup a server, begin by clicking the (i) in the lower right hand corner of the widget (the i will become visible when your cursor enters the widget area).
After you click the (i) the widget will flip over to expose the widget settings. If you are setting up your first server, simply begin by filling out the form. If you are adding a second or third server click the [+] button on the upper right of the widget. Here is a brief description and example of what each field means:
Name: This is a name for the server. This is anything you'd like it to be. Any text that will help you remember this group of settings. For example, My Work Server or Blog Number 1. The only rule is the name must be unique, you can not have two groups of settings named the same. After you have that filled out the Name field, hit TAB to go to the next field (the Server name will now appear in the list above)
Host: This is the FTP server address. It can either be in text form (ftp.host.com for example), or in IP form (192.168.1.333 for example). This setting should only be the server name without any ftp:// or path information. For example these are all 'incorrect'
ftp://ftp.myhost.com
ftp://user@host:192.168.1.4/test/test
For those example URIs you would put ftp.myhost.com and "192.168.1.4" in the Host field and nothing more.
Host Directory: If after login you have to navigate to a subdirectory, enter the path here. For example, using ftp://user@host:192.168.1.4/test/test the Host Directory would be "test/test". Often you'll have something like "www" or "main_html" on your account you'll want the files to upload to. If you want the files to upload into the main directory use "." for this setting.
User Name: is your account's user name
Password: is your accounts password
FTP Widget Server Select
If you have more than one server setup for uploading, you can select which server the file gets up loaded to by doing the following:
Click the (i) to flip the widget over.
In the upper part of the widget, highlight the server you wish to upload to.
Click Done.
When the widget flips back over you'll see Server: [Server Name] at the top of the widget - where [Server Name] will be the server you've selected.
FTP Widget Server Delete
To delete a server do the following:
Click the (i) to flip the widget over
Highlight the server you wish to remove, and click the [-] button on the upper right.
Click Done
FTP Widget Default Server Setting
If you redistribute the widget, you may want to setup a server by default. For example, and ISP could pre-configure the widget to upload to a users home directory.
To setup a default server, view the widget code by right clicking the widget (or command click) and choose Show Package Contents
Within that directory there is a file called PresetServerSettings.js - open this file in a text editor.
There are a few variables that can be set in this file. Here is the file contents:
//the nickname of the server (i.e. My Service)
var PRE_MARKNAME = "";
//the host (i.e. ftp.mysite.com)
var PRE_HOST = "";
//the target directory after login (i.e. htdocs/)
var PRE_TARGET = "";
//the user name to use for login
var PRE_USER = "";
//the password to use for login
var PRE_PASSWORD = "";
The variables should be self explanatory. Once they are set, the first time the widget is started these setting will be in effect. The client can, however, delete or edit the server setting in the normal way.